C-8 · Application Review, Status Checklist and Approval
Draft page
Captions marked [confirm] and the "Open items" section are still being verified against the live product.
Book C — Daily User Guide · Part 2 Applicants & Intake · draft v1 (2026-08-29)
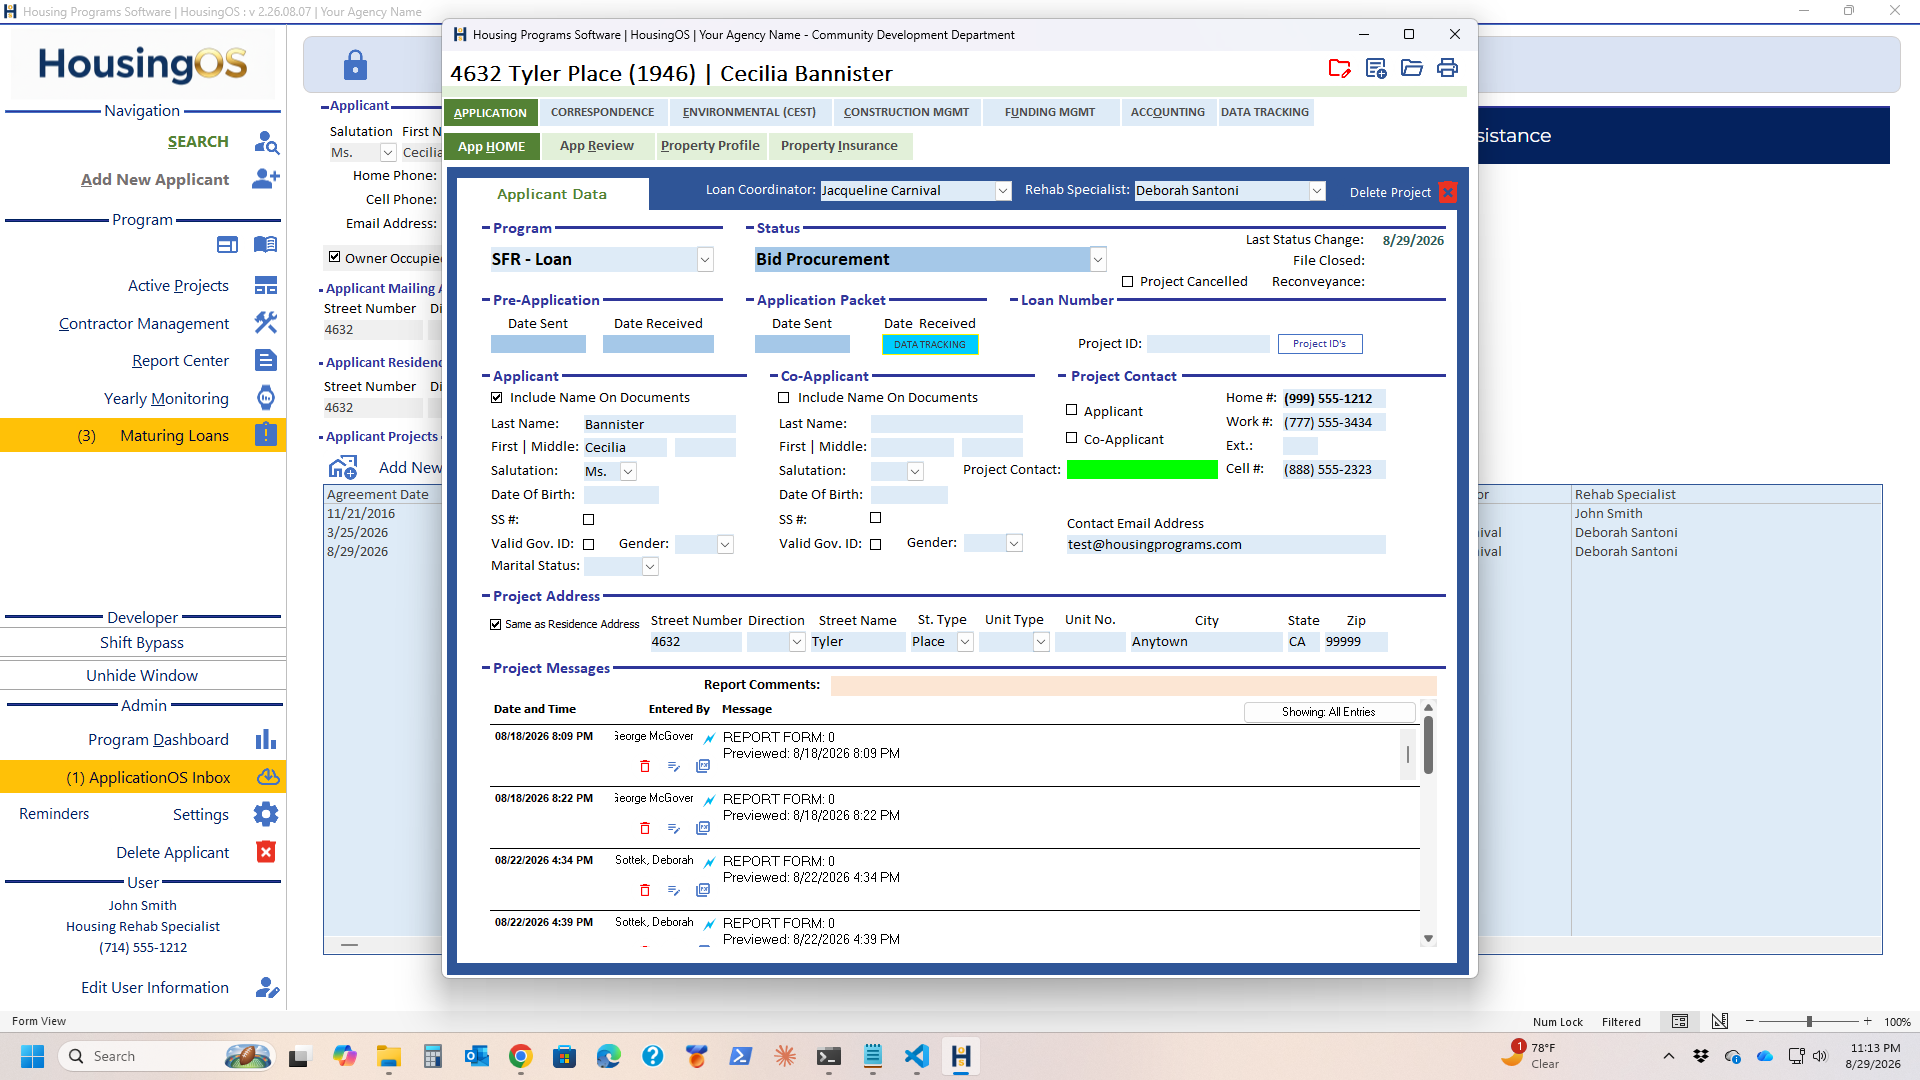
Who: loan coordinators When: throughout intake — the checklist is worked from day one; approval or denial closes the intake phase. Where: project window ▸ APPLICATION ▸ App HOME (Applicant Data: program, status, dates, contacts, project messages) and App Review (Application Review · Financial Review · HousingOS Workroom); the DATA TRACKING tab for program statistics. 📷
C08-00a/b✅ App HOME
 ·
· C08-00c ✅ Application Review · C08-02 ✅ Workroom · C08-04 ✅ Data Tracking
What you'll end up with
A project whose status checklist shows what has been done and who is responsible for what remains; an approval (or denial) date that moves the project status and unlocks the Approval Letter; and the applicant's uploaded documents reviewed in the Workroom.
Part A — The status checklist
- When the Program is chosen (▸ C-3 / C-4) HousingOS copies that program's default status list onto the project — one row per step (Pre-Application Sent … Application Approved … Bid Walk … Construction Complete … File Closed). This is the project's own copy: your administrator can change the program template later without disturbing projects already in progress (▸ B-5).
- Each row has a Responsible Party (pick the staff member — their initials fill in), a completed date and notes [confirm column captions]. Many rows are stamped automatically when you do the work elsewhere — entering the Approval Date, sending bid letters, emailing the Notice to Proceed — so work the tabs and let the checklist follow.
- The Project Status (shown in the Status box on App HOME, in the window title and on the Navigation grid, with Last Status Change beside it) advances with the checklist: e.g. entering a Final Approval Date sets Application Approved; an Application Denied Date sets Application Denied; clearing either returns it to Application In Process. You can also set it by hand from the Status drop-down on App HOME — that is logged as "Status changed manually to: …". Project Cancelled, File Closed and Reconveyance dates sit beside it.
📷
C08-01Status checklist with responsible parties and some completed rows.
Part B — Reviewing the application
- App HOME → Applicant Data holds the project's identity: Program, Status, Loan Coordinator, Rehab Specialist, Pre-Application and Application Packet sent/received dates, Loan Number / Project ID (Project ID's button opens the register), the Applicant and Co-Applicant blocks with Include Name On Documents, Project Contact (Applicant / Co-Applicant tick, phones, Contact Email Address), the Project Address (Same as Residence Address), and Project Messages — the project log (▸ C-20). Delete Project (top right) is permission-gated.
- App Review → Application Review gathers the intake facts: Program Terms, Funding Source (Interest Rate / Term / LoanTerm fill from the terms), Household Size, Type of Household, Head of Household, Race, Ethnicity, Property Occupied By, Female Head of Household, # of Occupants Age 62 or Over, Disabled / Veteran; dates — Date File Opened, Initial Review Completed, Application Denied Date, Pre-Approval Date, Pre-Approved Amount, Final Approval Date, File Closed Date; Estimated Project Cost, HOME-ARP; and the Program Referral ticks (Water Bill, Newspaper, Website, Friend, Code Enforcement, Other) plus funding flags (Faith Based, Multi-Address, Loan Guarantee, Corona Virus Related, Section 108 Loan). Fields marked DATA TRACK feed the DATA TRACKING tab.
- Program Terms — picking the terms fills Interest Rate, Interest Term, Loan Term, Funding Type and forgiveness frequencies from the program setup (▸ B-5). Change it only if the applicant is moving to a different product; the loan calculator reads these.
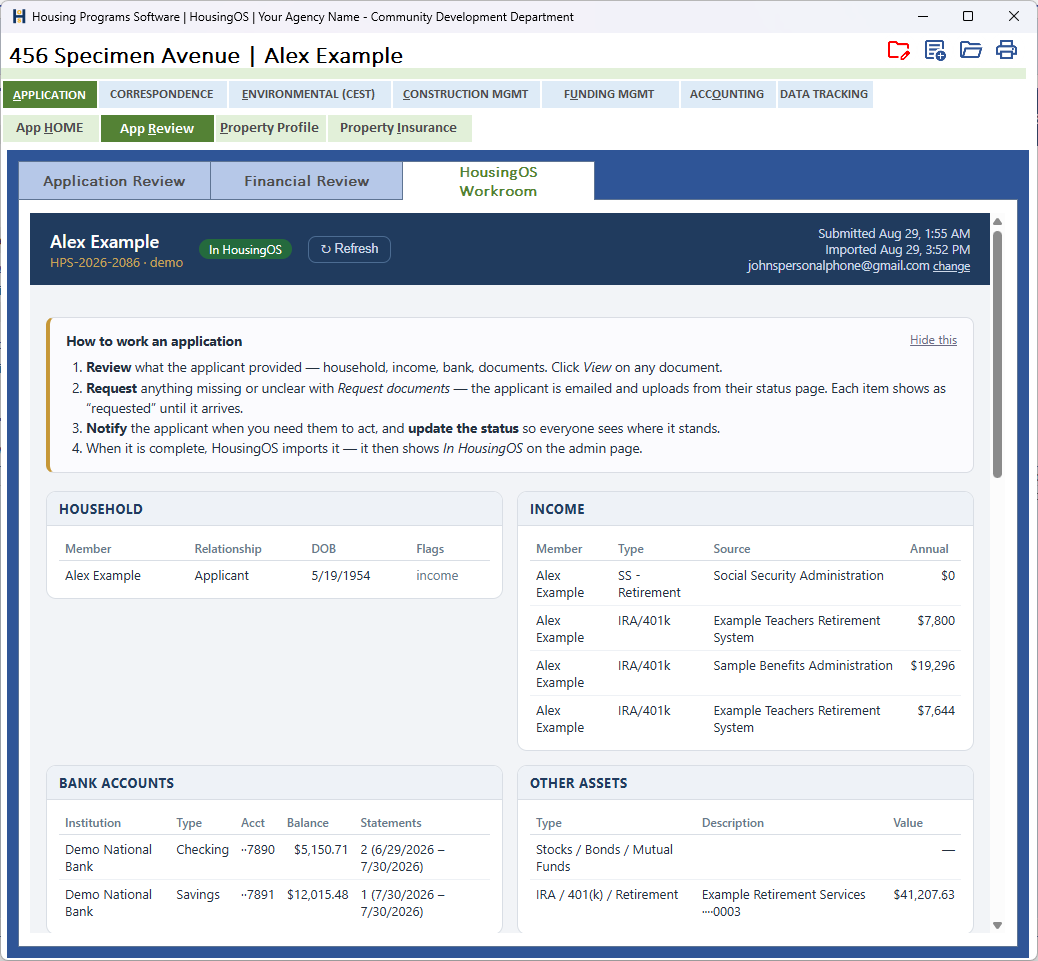
- HousingOS Workroom — for portal applications: the applicant's submission as they entered it (Household, Income, Bank Accounts, Other Assets, documents) with View on each document, Request documents, Notify and status controls, and a How to work an application strip. Once imported it shows In HousingOS. What you see is the local copy in the project folder (▸ C-4 step 7).
📷
C08-02
Part C — Approval or denial
- Final Approval Date — double-click to stamp today, or type it. HousingOS first checks the asset limit: if the household is over the program's limit the date is refused and reverts (the red OVER ASSET LIMIT banner on Financial Review tells you why — ▸ C-6). On success the status becomes Application Approved, household ages are recalculated as of this date (▸ C-5), the income determination is refreshed, and the Approval Letter button lights up.
- Click Approval Letter (Financial Review, under Calculate Form Data / Income Worksheet) — the letter is merged with the approval date, saved in 1 – Application, opened for preview, and logged "APPROVAL LETTER: Printed." The same button reads Denial Letter when an Application Denied Date is set instead ("DENIAL LETTER: Printed.").
- Application Denied Date — stamps the denial and sets the status to Application Denied.
📷
C08-03✅ covered by C08-00c / C06-01b.
Part D — Data tracking
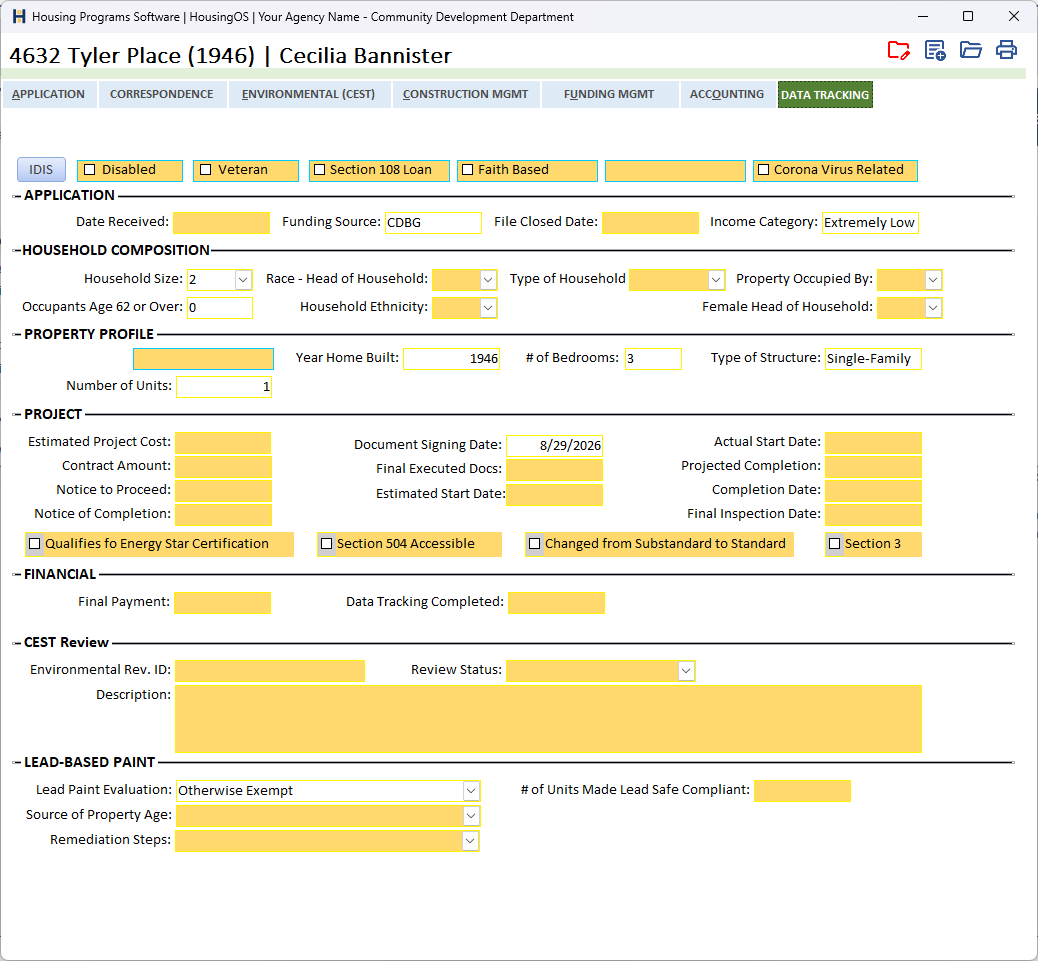
- The DATA TRACKING tab is the one-page IDIS/statistics view — APPLICATION (Date Received, Funding Source, File Closed, Income Category), HOUSEHOLD COMPOSITION, PROPERTY PROFILE, PROJECT dates and the four IDIS ticks, FINANCIAL (Final Payment, Data Tracking Completed), CEST Review, LEAD-BASED PAINT — with the flags Disabled / Veteran / Section 108 Loan / Faith Based / Corona Virus Related across the top and the IDIS button opening the entry sheet (▸ C-22). Yellow boxes are the ones IDIS needs; most fill from the other tabs. Check it before closing the file.
📷
C08-04
Watch-outs
- Approval Date won't stick → over the asset limit. Resolve the assets (or the program's limit, via the administrator) first.
- Changing the Program after approval replaces the checklist with the new program's defaults — you'll be warned (▸ C-3 watch-outs).
- Manual status changes are allowed but logged; prefer letting the dates drive the status.
- Program Terms empty → the household list won't take focus and loan figures stay blank; pick the terms (HousingOS opens the drop-down for you).
Screenshot shot list (Demo backend)
| Shot | Where | What to capture |
|---|---|---|
| C08-00a/b/c, 02, 04 | ✅ have them | |
| C08-01 | status checklist | rows with responsible party + dates — where does this list open? |
Video script — "Reviewing and approving an application" (target 2 min)
| # | On screen | Narration |
|---|---|---|
| 1 | Checklist | "Every project carries its program's status checklist. Assign responsible parties; most rows complete themselves as you work the tabs." |
| 2 | Application Review fields | "Application Review holds the intake facts, program terms and loan figures." |
| 3 | Workroom | "The Workroom shows the applicant's documents so you can review them against what was entered." |
| 4 | Approval Date → letter | "Enter the approval date — HousingOS checks the asset limit, updates the status, and enables the Approval Letter." |
| 5 | Outro | "Next: property profile and insurance." |
Open items for John (this chapter)
- Where the per-project status/responsibility checklist is shown to users (not visible on App HOME or Application Review screenshots) — or is it only behind the Active Projects cards?